#learningmoment I did not expect some of the cuts on this project to blow out so badly.
Most of the 3/4” sheets of Baltic birch in this 6 sheet job turned out great but at least 2 had MAJOR delamination and blowout. So what went wrong?


When cutting MDF or more coarse plywood, you’re fine to use the most efficient combination of settings to get your job done quickly and get on to the next one. Not so with fine plywood like Baltic Birch. Other fine plywoods with thin veneer faces like Apple-ply or Maple-ply are similar in that the face veneer is often paper thin and liable to delaminate or splinter if treated poorly! Use these tips to tune your feeds and speeds to work better with fine plywoods like these!
I did several things wrong (listed below) and it was only a matter of time until I got the bad results I did. Luckily it was a personal project, not one I was doing for a client, One who bought $100/sheets of material for me to ruin!
First Mistake, I used the same bit to do the plunge drill holes at the inside corners. This exposes the bit to lots of friction and heat, especially since I didn’t adjust the feed rate from the usual 30 in/min plunge speed in the bit settings. You can see where the bit started to char the wood, it heated up so much. By sheet 5 the bit was cooked and super dull. There’s a photo of the chared bit next to a brand new one!

Drill holes tend to char with the feed too slow and speed too fast.
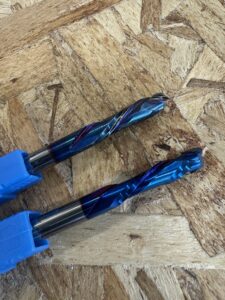
The bit looked charred and dingy after the drilling pass. Shown next to a brand new bit (bottom) for comparison.
Second Mistake, I did not find the right feed and speed rate for this material. I just used the default 100 in/min and 18k rpm I usually use. Later, I did a test with several combinations of feed and speed to find the best one for this material. It turns out setting both slightly slower did the trick!

I set up the 5 test cuts using different feeds speeds and pass depths.

Test cuts in 3/4 baltic birch with varying feeds and speeds and direction.

This was the default setting with 100 in/min feed and 18,000 rpm speed.
This was the climb cut – not very good.

This was the best one – a slower feed and speed with traditional direction and a 1/4″ first pass.
Third Mistake, and probably most important, I failed to ensure the first pass of the 1/4” compression spiral bit was deep enough to engage the DOWN spiral part of the bit on that crucial first layer of veneer. If the compression bit is not deep enough on that first pass (for this bit 1/4”) it will engage the UP spiral portion of the bit, effectively tearing the veneer up off the sheet.

In Mach3 you can set the depth of each pass. For compression bits, make sure the first pass is at least as deep as the bit’s bottom section (in this case 1/4″)
The lesson here? When you are starting a job on a new material that’s expensive and you want the outcome to be really tight without a lot of sanding (even sanding couldn’t fix some of these cuts), do a series of test cuts to nail down the ideal feed and speed for your tool/material combination.

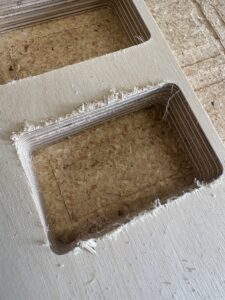
Even sanding did not help

I found that Hole drilling settings should be relatively slow RPM and fast plunge speed to avoid burning. Cuts using a compression bit should be traditional (not climb) and have a slower feed and spindle speed than usual to achieve the cleanest edge. After employing this process (a series of test cuts) I was able to get nice clean edges and have the result I wanted with minimal sanding.
Good luck!